

In "Photographing Flowers - Part 1" we discussed how to get close to your subject using macro lenses, close-up filters, and extension tubes. This installment will discuss a few more tips on photographing flowers.
Shoot at different angles
In my photograph "Brown Eyed Susans," I laid down on the ground to create the image. This had the effect of placing the yellow flowers against the blue sky. Complementary colors make nice compositions! Also the low angle makes the flowers look much taller than they actually are and gives a view of the flowers that people aren't used to seeing.
Try using this idea with your own flower subjects. Take a nice flower (or group of flowers), and shoot it from every angle: up, down left right. Even try tilting the camera, and see what interesting and unique compositions you can come up with.
Creative Lighting
Unless you bring your flowers into the studio, one of the easiest ways to use creative lighting to your advantage when photographing flowers is to use backlighting. Backlighting, when the light source is behind the subject, can create some very interesting effects when the light passes through the flower petals.
In my photograph Wild Columbine, backlighting highlighted the edges of the flower nicely. Also, the translucence of the petals reveals intricacies that cannot be seen with front lighting.
In "Backlit Tulip,"
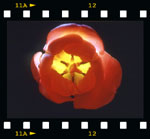 (right) I placed a flash on the ground beneath the flower to provide the backlighting source. By focussing very close to the flower, I eliminated the chance of lense flares from the flash. Even though my Nikon F4 has TTL flash metering, I still bracketed different exposures above and below what the meter picked. When using a flash in this manner, there are two ways to vary the exposure: change the flash output or change the exposure compensation in the camera. There may be subtle differences in the look of each method. Give each one a try so you can decide which way you prefer.
 |
||
| View Previous Tip | Back to the Tip Index | View Next Tip |